


When you are learning about a new technology, such as blockchain development, it is important to get some practical experience as soon as possible. You could start working on a simple application or look at some existing projects on Github and maybe add some new features…
Another fun and effective way to learn and practice is to do participate in coding challenges. There are various websites available that allow you to practice and improve your Solidity skills, one of them is EthereumHacker.com
There are 6 challenges in total to test your Solidity skills. The first 2 are very easy, then there are 2 intermediate and the final 2 challenges are slightly advanced.
I would like to show you how to analyze and solve each of the given challenges. You will be confronted with typical “problems” you encounter as a smart contract developer and solving those challenges will train you how to reason and think as a blockchain developer.
However, before we can tackle the first challenge, we need to do some setup work. We need to install Metamask and transfer some test Ether to our account. So, let’s get started.
Setting up our environment:
Metamask is a browser plugin (it is also available for iOS and Android) and it is supported by all major web browsers.
You can download Metamask from: https://metamask.io/download/
The installation is quick and easy. Click “Create a Wallet” to setup a new wallet and make sure to save your Recovery Phrase somewhere save.

I don’t keep real Ether (or other crypto currencies) on Metamask, I use those wallets only for testing and development. That’s why I’m not particularly careful about my recovery phrases – after all, there is no real value on it.
If, however you choose to keep real Ether on your Metamask wallet, you should not store your recovery phrase in digital form. For real Ether, I recommend you use only cold storage like Trezor, Ledger…
Once you are finished installing Metamask, you are automatically connected to the Ethereum Mainnet and you have one account.
Configuration of Metamask:
Click on the Metamask icon in your browser and on the popup window, click the colored circle icon on the top right.

On the menu that opens, click “Settings”:

When you click the “General” menu you can change various general parameters, like: the primary currency to display, the language, the Metamask theme…
- Next, click the “Advanced” menu and do the following:
- Switch “Advanced gas controls” on
- Switch “Show test networks” on
- Switch “Customize transaction nonce” on
- You can also increase the value of the “Auto-lock timer”
Select the “Goerli test network” from the available list of networks (on top of Metmask).
Getting some Goerli test Ether:
We will be using the Goerli test network to solve our challenges. To execute transactions, you need some test Ether, which can be obtained for free on various so-called faucets.
Here are two url’s for Goerli faucets:
Unfortunately, those faucets are not always working and you may be required to try another service. If none of the faucets mentioned above are working, just type “goerli faucet” into Google and try some other services.
Our first challenge – The Gala NFT:
Ok, we are ready to tackle our first challenge. Go to EthereumHacker.com and click on the first challenge: “The Gala NFT”

On the top-right of the page, click the “Connect” button to connect your Metamask account to the website. On the Metamask popup window, just select your account (if it is not already selected) and click the “Next” and “Connect” button.
Your task:
You need to get access to the Gala party, but they are scanning for an NFT at the door. The NFT’s are all sold out, so the only option left is to hack the smart contract and to figure out a way to send an NFT to your wallet address.
You can check out the code of the smart contract at: https://goerli.etherscan.io/address/0x484Ec30Feff505b545Ed7b905bc25a6a40589181#code
Solving the challenge:
Ok, let’s take a look at the smart contract code at: https://goerli.etherscan.io/address/0x484Ec30Feff505b545Ed7b905bc25a6a40589181#code
There are actually 10 different smart contracts listed, but the only one we are interested in is the first one: Level1.sol
The Level1.sol contract inherits from the OpenZeppelin ERC721.sol, which in turn inherits from several other contracts and that’s why we have all those contracts listed.
So, what are the functions available on Level1.sol? We have mint and increaseMaxSupply – both of them are public, so we can call them. We also have to getters for _tokenId and _maxSupply.
On the Etherscan contract page, click on the “Read Contract” tab next to the “Code” tab. On that page you can access all read-only functions – those from Level1.sol as well as all inherited members:

We are only interested in the 2 getter functions mentioned above. Click both of them and make a note of the values. The value of _tokenId will probably be equal to _maxSupply + 1.
That’s a problem, because in the mint function we have the following code:
function mint(address _to) public {
        require (_tokenId <= _maxSupply,"You need to increase the maximum supply");
        _mint(_to, _tokenId);
        _tokenId += 1;
}
In order to mint an NFT to our wallet address, we need to call the mint function. However, if the current _tokenId is bigger than the _maxSupply, the mint function will revert with an error because of the “require” statement.
So, what can we do? We need to increase the _maxSupply and we can do that by calling the increaseMaxSupply function. This will than allow us to pass the require statement in the mint function and to send an NFT to our wallet address.
Click on the “Write Contract” tab (next to the Read Contract tab), then click the red “Connect to Web3” button and on the popup window, click “Metamask“:

Now, click on “increaseMaxSupply” and click the “Write” button. Confirm the transaction in Metamask. Now, when you go back to the Read Contract tab and check again the _maxSupply value, it will have increased by one.
Now, the mint function will pass. Copy/paste your wallet address into the _to field of the mint function, click the “Write” button and confirm the transaction in Metamask:

You have just minted a Gala NFT token to your wallet address. On Metamask, click “Import Tokens” (on the Assets page, below) and copy/paste the address of the Gala NFT smart contract into the “Import tokens” window: 0x484Ec30Feff505b545Ed7b905bc25a6a40589181
For “Token decimal“, specify 0 and click the “Add custom token” and then the “Import tokens” button:
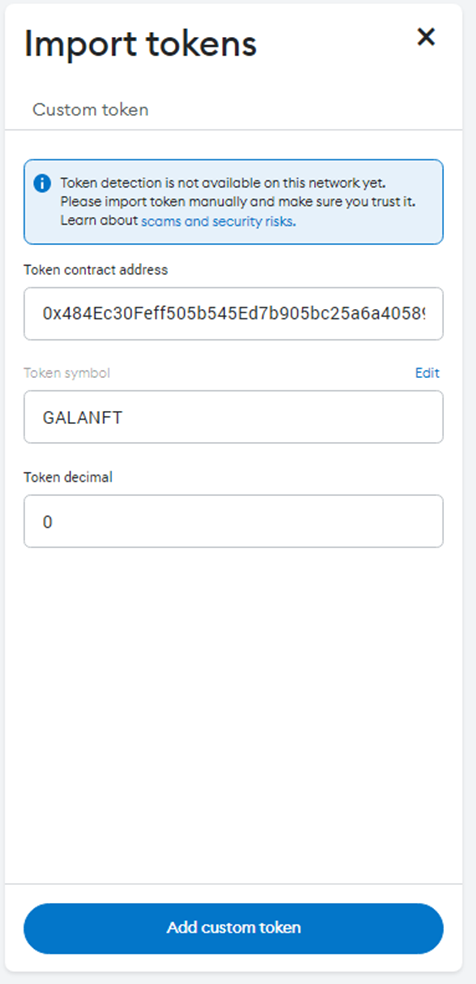
In Metamask, under assets, you will now see 1 GALANFT:


[…] This is challenge number 2 from the EthereumHacker.com list of challenges. Before you can tackle any of the challenges, you first have to install and configure Metamask. If you have not already done so, please take a look at the basic configuration instructions at: EthereumHacker Challenge 1 – The Gala NFT […]
[…] This is challenge number 3 from the EthereumHacker.com list of challenges. Before you can tackle any of the challenges, you first have to install and configure Metamask. If you have not already done so, please take a look at the basic configuration instructions at: EthereumHacker Challenge 1 – The Gala NFT […]
[…] This is challenge number 4 from the EthereumHacker.com list of challenges. Before you can tackle any of the challenges, you first have to install and configure Metamask. If you have not already done so, please take a look at the basic configuration instructions at: EthereumHacker Challenge 1 – The Gala NFT […]
[…] This is challenge number 5 from the EthereumHacker.com list of challenges. Before you can tackle any of the challenges, you first have to install and configure MetaMask. If you have not already done so, please take a look at the basic configuration instructions at: EthereumHacker Challenge 1 – The Gala NFT […]
[…] This is challenge number 6 from the EthereumHacker.com list of challenges. Before you can tackle any of the challenges, you first have to install and configure MetaMask. If you have not already done so, please take a look at the basic configuration instructions at: EthereumHacker Challenge 1 – The Gala NFT […]